 Nic Dunn, CEO, Charle Agency
Why Customizing Your Shopify Checkout Matters
The short answer: you edit the Shopify checkout in three layers. The checkout and accounts editor in your Shopify admin handles branding, layout and app blocks on every plan. Checkout UI Extensions and Shopify Functions add custom interface elements and backend logic. The Checkout Branding API gives developers pixel-level control, and it is limited to Shopify Plus. checkout.liquid has gone, so editing checkout code directly is no longer an option.
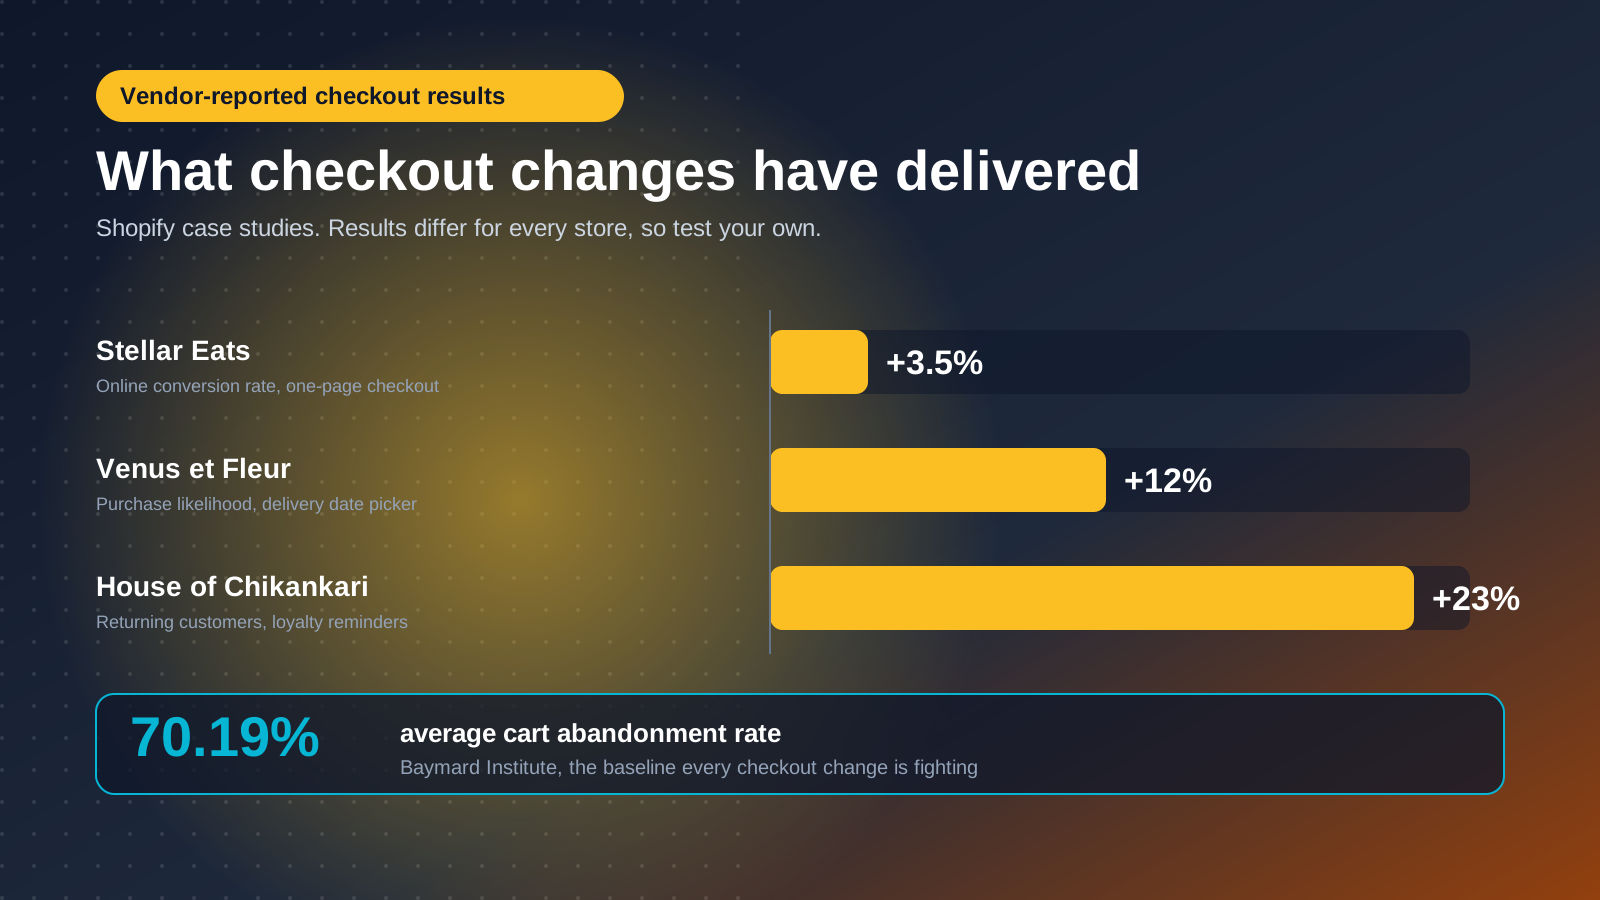
The checkout is the highest-intent page on your store. Every visitor who reaches it has already browsed, added to cart and decided to buy. The Baymard Institute puts the average documented cart abandonment rate at 70.19%, and a large share of that drop-off happens inside checkout itself. Unexpected costs, forced account creation, limited payment options and weak trust signals are the usual causes. Our guide to reducing cart abandonment covers the wider picture.
Customizing checkout lets you address each cause directly: shorter forms, a branded look that matches your store, upsells that lift average order value, and delivery messaging that answers the shipping question early. Targeted checkout work can lift conversion by 10 to 15%, the range we scope for clients. See our Shopify conversion rate optimization guide for testing.
Shopify Checkout in 2026: What Has Changed
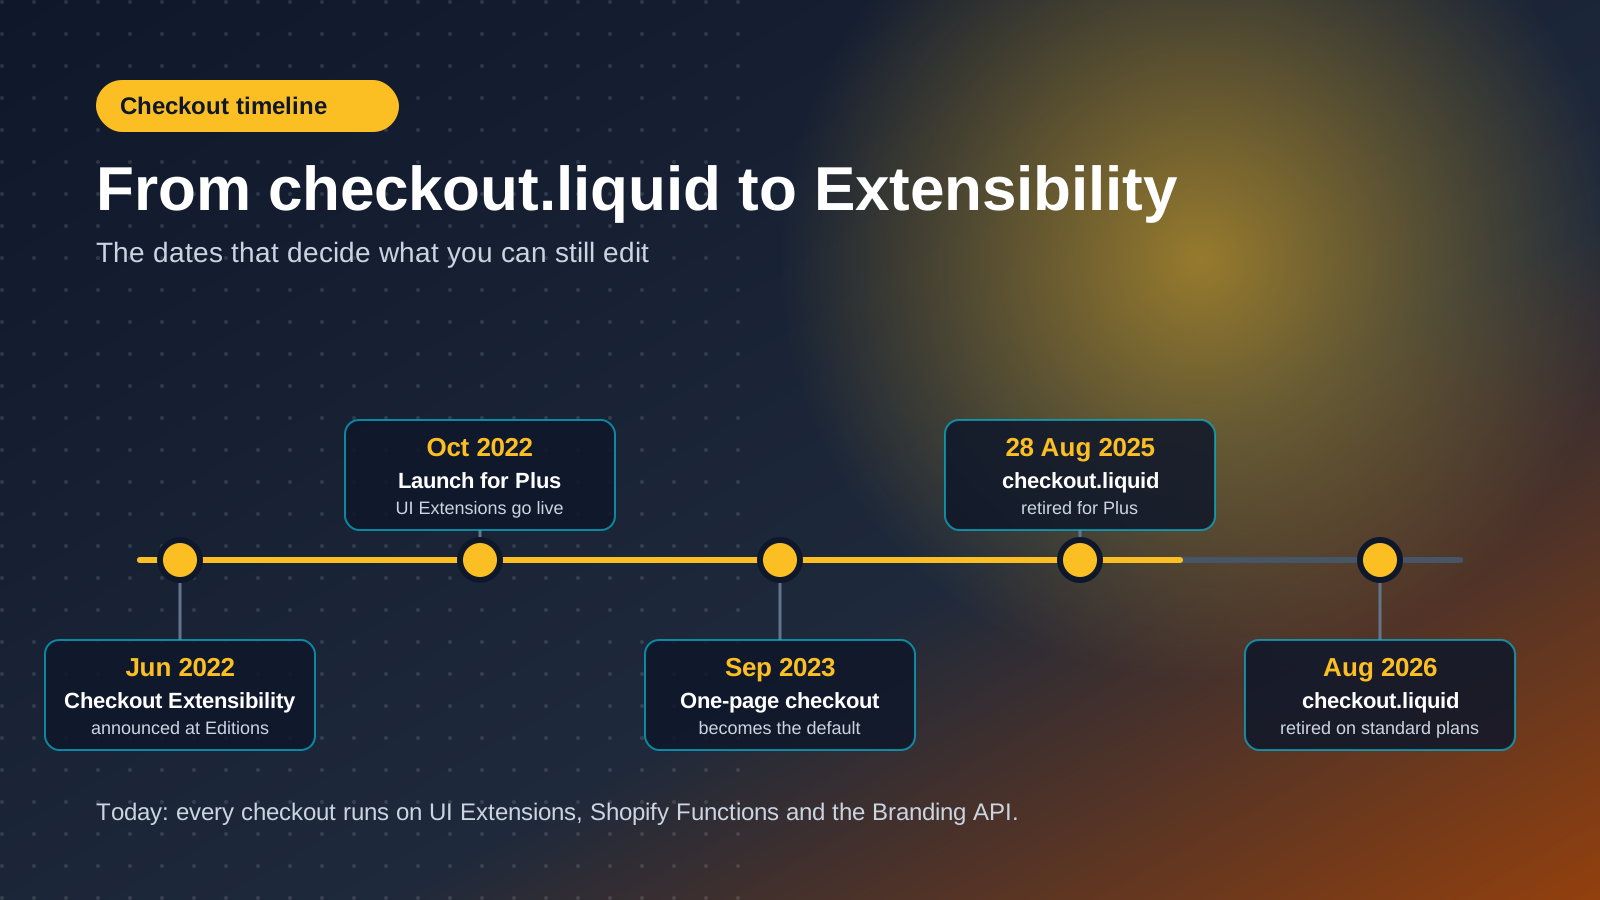
If you last looked at checkout customization before 2024, the landscape is unrecognizable. The old checkout.liquid file, which allowed direct code edits, has been retired. Plus stores lost it on August 28, 2025, and standard plans followed in August 2026. Any customization that still depended on checkout.liquid is gone, and the checkout now runs on Checkout Extensibility with three core pillars:
- Checkout UI Extensions add custom interface elements (upsells, trust badges, custom fields, banners) at set target locations in the checkout
- Shopify Functions change how checkout behaves on the backend, including custom discounts, payment method filtering, shipping logic and validation rules
- Checkout Branding API controls colors, fonts, logos, corner radii and spacing programmatically
Together they give merchants an upgrade-safe way to change the checkout. Extensions run in a sandbox, so they cannot read sensitive payment data or break the core flow. That makes them far more stable than the old approach, where one code error could stop customers completing a purchase.
Two layout changes matter day to day. One-page checkout became the default in September 2023, with a three-page option kept for stores that want it. And since February 2026, Shopify no longer lets merchants add background images to the checkout header or main content area. If you already have one set, you can keep it but not change it, only remove it. For the layout detail, read our guide to Shopify one-page checkout.
Using the Checkout and Accounts Editor
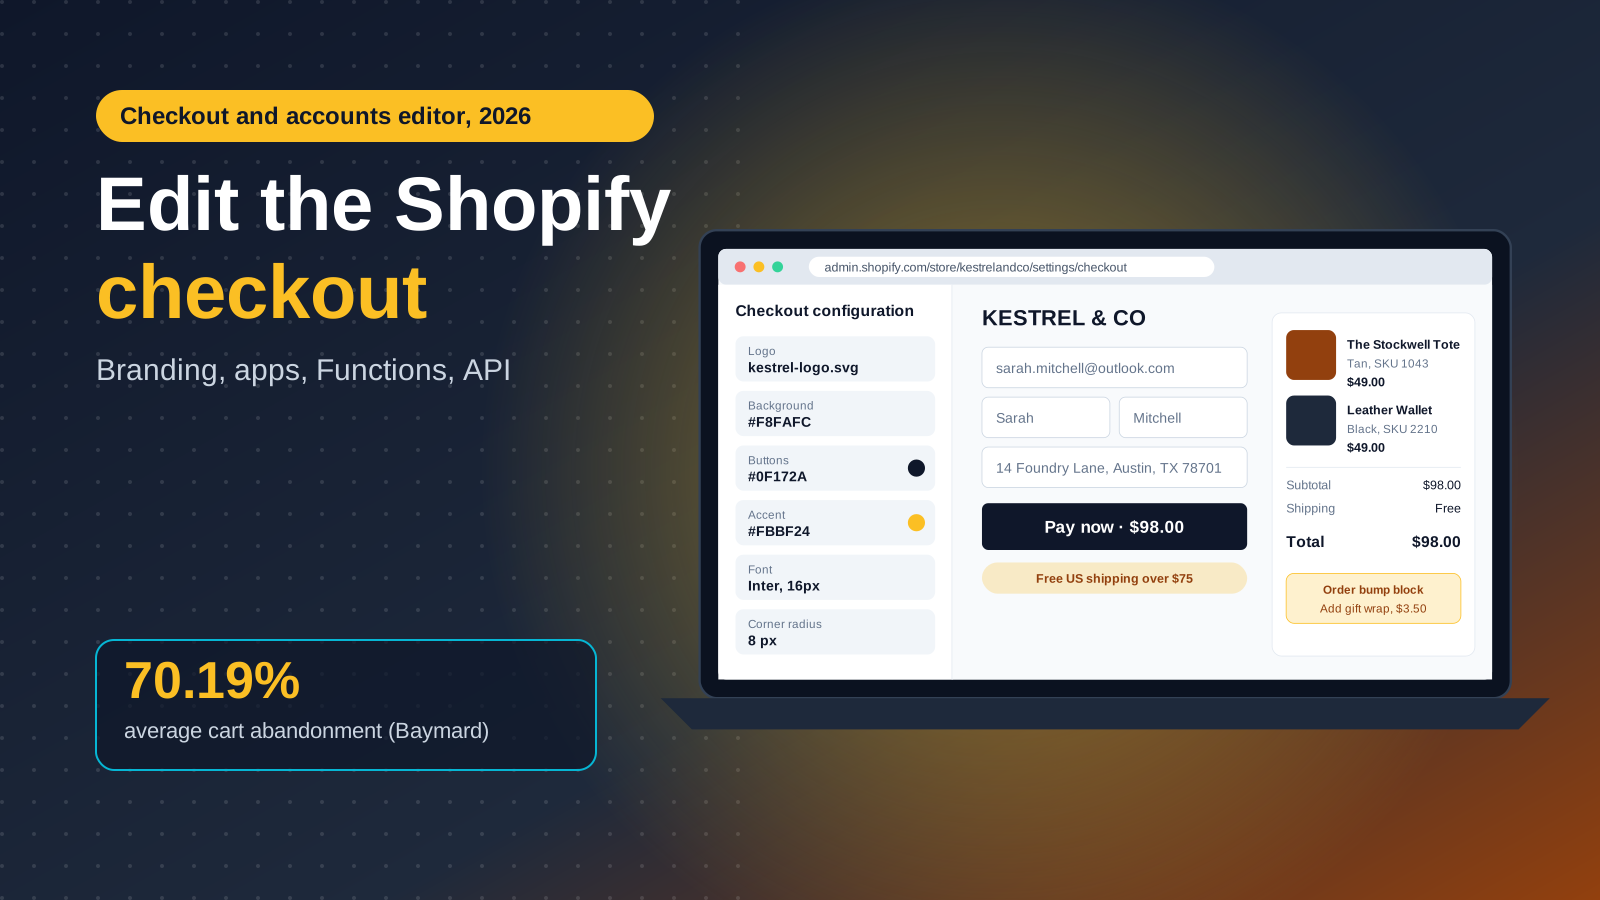
The checkout and accounts editor is the main way to customize your Shopify checkout without code. In your Shopify admin, go to Settings > Checkout, then select Customize next to the checkout configuration you want to edit. The editor works like the theme editor, with a live preview on the right and settings on the left. It covers four connected surfaces: the checkout itself, the thank you page, the order status page and the customer accounts pages. Some branding choices carry across to customer accounts automatically.
Branding and Style
Upload your store's logo and set its size and placement in the checkout header. Color settings cover the background, form fields, buttons, accents and error states, and typography controls let you choose fonts for headings and body text. You can also set corner radii, spacing and borders. These small details are what make a checkout feel like part of your brand rather than a generic payment screen. Basic styling like this is available on every plan except Shopify Starter.
Layout Options
The default is a one-page layout where contact, shipping, payment and the order summary sit together. The three-page option is useful for one specific reason: it is the only layout where you can control the visibility of the discount code field. Most stores should stay on one page, but if discount codes send shoppers off to hunt for a coupon, the three-page layout is worth testing. The order summary can also be configured to control product images and how line items display.
Adding Apps via the Editor
After installing a checkout app from the Shopify App Store, it appears as a block you can drag into position. Target locations include above and below the order summary, after shipping methods, and around the payment step. Checkout Blocks, Shopify's own free app, adds simple blocks without a developer. Apps that place blocks on the information, shipping and payment pages need Shopify Plus, while apps for the thank you and order status pages work on Basic and above.
Customizing Checkout Form Fields
The information your checkout collects sits under Settings > Checkout in the Shopify admin. Shopify does not allow fully custom form layouts, but the checkout form options let you decide which information fields customers see, and whether each is hidden, optional or required. That is more control than most merchants use. Changes can take up to 30 seconds to appear at checkout, so refresh before you assume a setting has failed.
Customer Contact Method
Choose whether customers give an email address, a phone number, or either. Email is the default on new stores and remains the right choice for most brands. Offering phone suits markets where SMS is the preferred channel. You can also show a prompt to download the Shop app. If you require customers to sign in before checking out, only email works, and accelerated options such as Apple Pay are hidden from the cart so nobody skips the requirement. Forced sign-in is a conversion risk, so weigh it carefully.
Customer Account Settings
Accounts can be disabled, optional or required. Optional accounts with a clear benefit, such as order tracking or faster future checkouts, strike the best balance between data capture and friction. Configuring the right payment gateways alongside this keeps the whole flow short.
Shipping Address Fields
Most customer information fields can be hidden, optional or required. Full name can be one field or two, and company name, company VAT number, address line 2 and the shipping phone number each have their own setting. Filling in a company name enables business-only shipping options, and valid EU or UK tax ID numbers can trigger reverse-charge treatment. Three details catch merchants out: Shop Pay does not require a company name, so some Shop Pay orders will not include one even when the field is required; Apple Pay and Google Pay shoppers may have to type a company name their wallet lacks; and making address line 2 required, or removing it, can block customers in certain types of residence. These settings do not apply to B2B checkouts, and regional address components set by country cannot be changed.
Marketing Consent, Tipping and Extra Fields
Email, SMS and WhatsApp consent can be shown at checkout, and email consent can be preselected by region. SMS consent can never be preselected. You can enable tipping and order notes where your business model supports it. For anything beyond the built-in options, such as gift messages, delivery date preferences or engraving text, Checkout UI Extensions with metafields are the better route, because they store the data against the order.
Thank You, Order Status and Customer Account Pages
The checkout does not end at payment. The thank you page, order status page and customer accounts pages are all editable from the same editor, and they are where post-purchase work happens: referral offers, surveys, loyalty prompts and discount codes for a second order. You manage all of them from the Shopify admin under Settings > Checkout. Apps for these pages work on every plan from Basic upwards, which makes them the cheapest place to start if you are not on Plus.
Post-purchase upsell extensions, which appear between payment and the thank you page, are listed by Shopify as a beta feature that live stores must request access to. Treat them as a later-stage experiment rather than a launch dependency. On the order status page, a Buy again button is available to Plus merchants only.
Checkout UI Extensions: Adding Custom Functionality
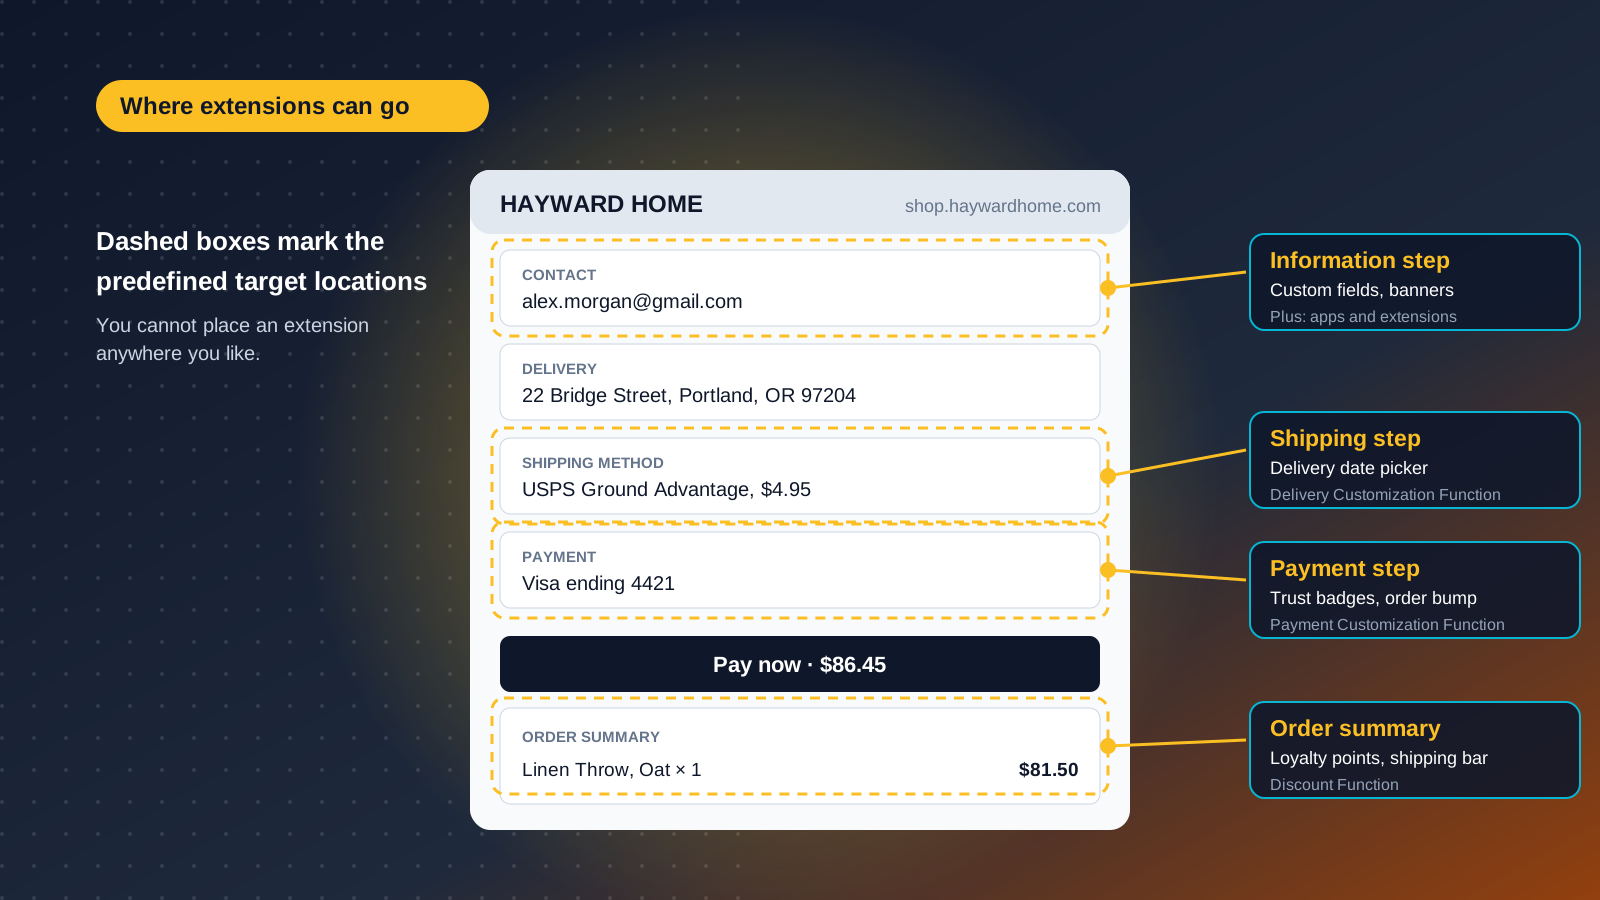
Checkout UI Extensions are the main way to add custom interface elements. They run in a secure sandbox at predefined target locations across the information, shipping and payment steps and the order summary.
What UI Extensions Can Do
- Order bumps and upsells: show complementary products directly in checkout so customers can increase their order value before paying
- Trust badges and guarantees: security seals, money-back promises or delivery commitments
- Custom form fields: gift messages, delivery preferences or tax ID numbers
- Loyalty, delivery date pickers and banners: points balances, preferred delivery windows and free shipping thresholds based on cart contents
Shopify's own case studies show the commercial upside. Venus et Fleur reported a purchase lift of more than 12% from a delivery date picker, and House of Chikankari saw 23% more returning customers after adding loyalty reminders. Treat these as vendor-reported results rather than benchmarks, since conditions differ for every store.
Target Locations
You cannot place extensions anywhere you like. Shopify provides fixed targets around shipping method selection, the payment method, the order summary, and the thank you and order status pages, and the list has grown with each release.
How to Add UI Extensions
Most merchants should install a checkout app that supplies the extension, then place it with the editor like a theme block. Brands with bespoke needs can have a developer build custom extensions with the Checkout UI Extensions API. They are written in JavaScript (React-based), use Shopify's component library to match the checkout's styling, and work with Shop Pay too. Custom checkout apps require Shopify Plus. Charle builds these through our Shopify app development service, from bespoke upsell logic to complex B2B checkout flows.
Shopify Functions: Changing Checkout Behavior
UI Extensions control what the checkout looks like. Shopify Functions control how it behaves. Functions run on Shopify's infrastructure, replaced the older Shopify Scripts, and execute in a WebAssembly runtime for speed and security. The Functions API documentation lists every available type. The main ones for checkout are:
Discount Functions cover volume discounts, tiered pricing and buy-X-get-Y with complex conditions. Payment Customization Functions hide, reorder or rename payment methods, for example hiding cash on delivery above a set order value. Delivery Customization Functions rename, hide or reorder shipping options. Cart and Checkout Validation Functions add rules that can stop checkout, such as blocking product combinations or enforcing a minimum order quantity. Order Routing Functions choose the fulfillment location for each order. Our guide to Shopify Functions goes deeper.
Functions and Shopify Plus
The plan line is simpler than it used to be. Public apps built on Functions can be installed on any plan except Shopify Starter. Writing your own custom Function app is what requires Shopify Plus. In practice, a standard-plan merchant can install an app that hides a payment method, while a Plus merchant can have a developer write the exact rule they need. Which route you take is a plan and budget decision, and it is one reason brands upgrading to Plus often see an immediate improvement in checkout performance.
The Checkout Branding API
The Checkout Branding API gives developers programmatic control over checkout design: favicons, per-section color schemes, typography, corner radii, spacing, and logo and header layout, at a precision the visual editor cannot match. It suits agencies and teams managing several stores, because branding can be version-controlled, replicated across stores and updated from code. We use it when a client needs the checkout to match its design system exactly. It is available to Shopify Plus merchants only, so standard plans keep the editor's basic branding.
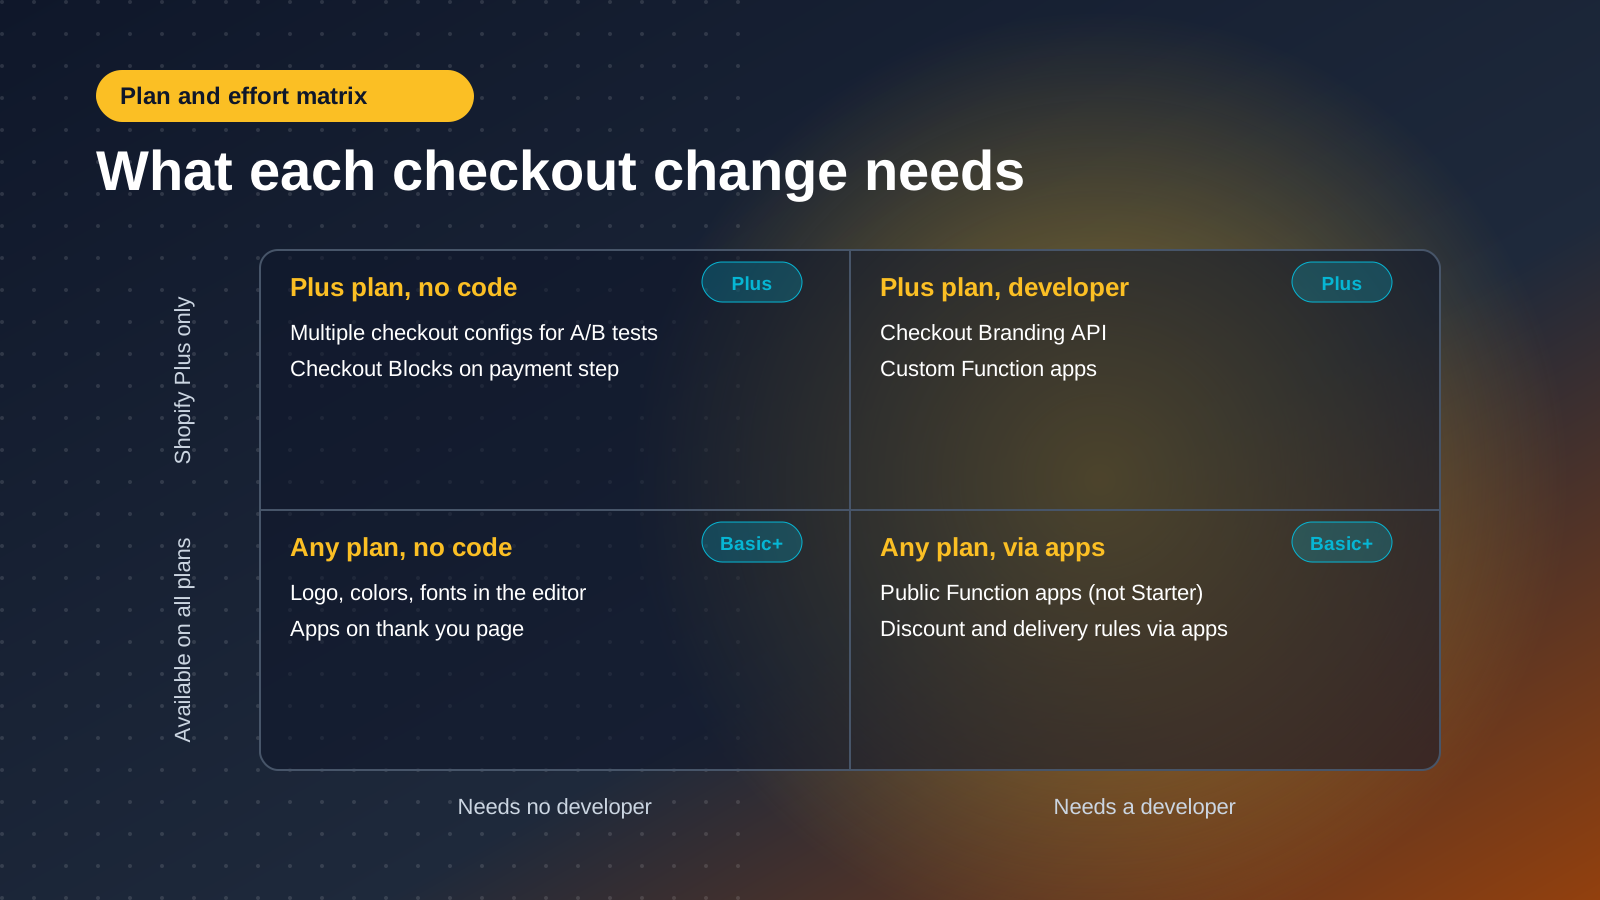
Checkout Customization by Shopify Plan
Not every checkout feature is available on every plan, and the boundaries decide what you can plan. This table summarises where each capability sits.
| Capability | Basic, Shopify, Advanced | Shopify Plus |
|---|---|---|
| Checkout and accounts editor (logo, colors, fonts) | Yes | Yes |
| Apps on thank you and order status pages | Yes | Yes |
| Apps on information, shipping and payment pages | No | Yes |
| Public apps using Functions | Yes (not Starter) | Yes |
| Custom Function and checkout apps | No | Yes |
| Checkout Branding API | No | Yes |
| Multiple checkout configurations for testing | No | Yes |
Why Shopify Plus Changes the Picture
Plus merchants get the full range, plus B2B checkout features that have expanded in 2026, such as custom fields for net payment terms and company-specific pricing. Read more on Shopify's B2B features if wholesale matters to you. If checkout capability is the reason you are weighing an upgrade, our Shopify vs Shopify Plus comparison covers the full picture.
Testing and Optimizing Your Checkout
Changing the checkout is half the job. Testing and measuring is what separates optimization from guesswork.
Preview and Test Orders
Treat Customize as a staging step: duplicate your live checkout configuration, select Customize on the draft, preview every change, and publish only after test orders pass. Try it on a development store before the live store, then place test orders with Shopify's Bogus Gateway or test mode to confirm form fields, apps, extensions and payment methods all work. Inventory is only held when the customer submits payment, and a failed payment releases that hold, so test the failure path too, including shipping rates and orders that skip the shipping step. Check mobile on real devices, because elements that look fine on desktop often create friction on a small screen.
A/B Testing Checkout Changes
Plus merchants can run multiple checkout configurations and compare them. For example, Shopify reports that Stellar Eats lifted online conversion by 3.5% after moving to one-page checkout. Our guide to A/B split testing covers method. Give each test enough traffic for statistical significance, with checkout conversion as the primary metric and average order value, payment completion rate and return rate as secondary checks.
Checkout Pixels and Key Metrics
Customer events at checkout feed analytics and ad platforms through pixels, which support retargeting, abandoned-cart recovery and attribution (consent rules apply in some regions). In Shopify Analytics, watch checkout abandonment rate, payment failure rate and sessions to conversion. For deeper analysis, combine Google Analytics 4, CRO tooling and session recordings to see where customers hesitate.
Our View: Spend on Functions Before You Spend on Pixels
Most checkout briefs we scope start with appearance: a new color palette, a banner, a trust badge row. We think that order is backwards. The editor handles branding in an afternoon on any plan, so it should never be the big line item. The money is better spent on checkout logic. A validation rule that stops an impossible order, a payment method hidden where it causes failed payments, or a delivery option renamed so customers understand it, removes friction that no banner can fix.
We would also resist stacking extensions. Every upsell, badge and reminder competes for attention at the moment a customer is trying to pay. Pick one commercial job for the checkout, usually an order bump or a delivery promise, run it as a proper A/B test on Plus, and only add a second element once the first has a result. If you want a second opinion on your checkout, get in touch and we will review it with you.